Claire with Trellis Point Crochet. Claire likes to help…or hinder…any needlework project.
The book in the photo is The Complete Book of Crochet by Elizabeth L. Mathieson, Greystone Press, June 1947 reprint. The pattern here is not directly from this book, but the book does have very interesting vintage pieces.
Would you love to have linens decorated with beautiful crocheted lace, but don’t love the $100 price tags? Perhaps you need a special wedding or Christmas present, but you’re on a budget? This crochet pattern is fairly simple to learn and makes an elegant edging for linens. Once you learn the basics, you can easily add different elements or use different colors of thread to create many different sizes and looks.
*I have to acknowledge here that, to the purist lacemaker, there are only two types of real lace: bobbin lace and needlepoint lace. Most of the time, though, we call all sorts of fine trim “lace”: be it tatting, knitting, or crochet.
What You Will Need
Crochet Hook. I used a size 1 steel hook with size 10 cotton for the model so that it would be easy to see. Of course, you’d use a smaller hook for finer threads.
Ball of Crochet Cotton. Choose a smaller number, such as 10 if you want a slightly coarse look, 30 or larger if you want a more delicate look.
Stitches You Need to Know
Chain (ch)
Double Crochet (dc)
Basic Trellis Point Lace Tutorial
NOTE: This isn’t a complete “how-to crochet” lesson, but I’m going to make the directions as simple as I can so that beginning crocheters will understand. When I first made this lace, I’d never have figured it out if I hadn’t had something visual to follow. More advanced crocheters may be able to recreate this pattern simply by looking at the photos.
*Also, when you’re crocheting, the photos show the trim from different angles. You may have to turn your crochet around to match the photo if you’re trying to understand a step.
Make a Shell
First, you need to know how to make a shell. All of the shells except the first on in this piece are 3 ds; ch 3; 3 ds. Now, let’s work the first shell together. Remember, this first shell is different from later shells.

1. Crochet a chain (ch) of 5 stitches and join to make a ring.
2. Chain (ch) 2 coming from the ring. (This chain 2 substitutes for 1 dc).
3. Turn and make 2 double crochets (dc) into the ring.
4. Ch. 3, then make 3 more dc in the ch-3 space.
Make Another Shell
Now, you’re going to make another shell inside the first one. The chain-3 makes a little bump/opening (see photo) in the shell. This is where you’ll make another shell.

5b. Chain 5 to turn, then turn your work and make a cluster of 3 dc in the chain-3 space of the first shell.
5d. Now chain 3, and make 3 more dc in the chain-3 space of the first shell.
The loop pointing up in the photo is a chain-5. From this point on, your shells will be made 3dc; chain 3; 3 dc. Each shell is made inside the chain-3 space of the previous shell.
Make a Third Shell

6. Chain 5 and turn your work. Make a shell of 3dc-ch3-3dc in the chain-3 space of the previous shell. This will be shell number 3.
In the photo, you’ll see a ch-5 loop hanging down between the 1st and 2nd shells. You might say this was your first “row” of the trellis. The first row had 1 space. Now you’re going to start the second row of the trellis.
7a. Instead of making a chain-5 coming down from your shell, chain 2 (This is where the photo says chain 3….it’s an uh-oh on my part.)
7b. Now double crochet into the point of the previous shell. (Where the ch-5 connects; look at the photo)
8. You’ve now made one space on the 2nd row of the trellis. Now chain 2 again and dc into the 3rd stitch of the 5-stitch loop between shells 1 and 2. This is your 2nd space in the 2nd row.
Row 3 of the Trellis

9a. Now chain 5 and turn your work. (You’re working up TOWARD the shells again.)
*At times you may forget where you are and try to go up the wrong side of the trellis. Remember that you’re ALWAYS working on the side farthest away from the end where you started.
9b. Make a dc as shown. You’re actually making a dc in the same place (middle of the ch-5 loop between the shells) as you made the dc in step 8b.
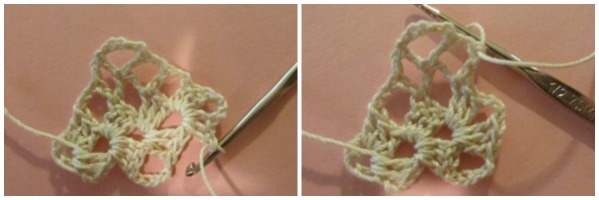
10. Ch 2, then dc into the top of the first dc of the 3-dc-cluster in the shell below.
11. Ch 2 to make the top of the 3rd space on this row.
If you look in the photo, this space is above one of the 3-dc clusters of the shell. You DON’T have to make a double-crochet here; the first dcs of the shell will be the side of this space.
12. Now make a shell of 3 dc, ch 3, 3 dc as shown.
Row 4

Continue making ch2 dc spaces in row 4.
14. Ch2. Dc in point of previous shell to make first space.
15. Ch2. Dc in top of dc in previous row, as shown.
16. Ch2. Dc in top of dc in previous row, as shown.
17. Ch 2. Dc in center (3rd stitch) of ch-5 turning space made in step 9 above.
Row 5

Working on Row 5 of Trellis.
18. Chain 5 for the point. Turn. Dc into top of previous dc. Continue as before.
19-21. Ch 2, dc in top of dc in previous row.
22. Ch 2. Make Shell; Ch 5; Turn
Congratulations! You have one trellis point.

First Trellis completed and starting on 2nd row of next trelli
24. Make a (3-dc; ch 3; 3 dc) shell.
25. Ch 5. Turn your work. This is the first row of your next trellis.
26. Make another shell.
Repeat steps 6 – 23 until you have the length of trim you need.
A Few Hints
* Remember that cottons shrink, so be sure to add a little extra if you’re putting your trim on something that may shrink a little over time. If you are using this trim on cotton sheets that you really intend to use a lot, you might want to wash both the sheets and the trim in warm water before sewing on the trim. That way, hopefully both sheets and trim will shrink and you won’t have as much puckering.
*Before you sew your lace onto sheets or other linens, you will probably want to dampen it, gently put it into shape, and then dry it (block it.) Don’t stretch it when you dry it, however. If giving the lace alone as a gift, you will probably want to starch it lightly.


