 This month’s Lowe’s Creator challenge is fall or Halloween decor. I wanted to do something that would work indoors or outdoors. The kids love Jack O’ Lanterns, but last year we had a pumpkin malfunction when rain got inside and rotted our carved pumpkins into something truly terrifying. (Hey, I’m just keeping it real here.)
This year, I hit the ceiling fan aisle in Lowe’s – yes the lights – and picked up three of those medium sized glass globe replacements and had a flash of brilliance. Here’s what you need to make these gorgeous little glowing pumpkins.
- 3 (or however many) 6″ Round White Globes (you could use clear also.)
- 1 pack (3 count) LED puck lights (battery operated so NO wires!)
- Spray paint (orange, black, or frosting for desired effect)
- Masking or duct tape
- Exacto knife
I picked up everything at Lowe’s except the Exacto knife for under $50 bucks! I needed an Exacto knife anyway, so I just snagged one at Walmart to use for cutting the masking tape. I used this 3-pack of LED puck lights which fit PERFECTLY on top of the neck of the globes without falling inside. Seriously? Perfectly. Thank you crafting Muses.

An LED puck light makes these glass pumpkins glow brightly for Halloween #LowesCreator
I assembled these really quickly and easily all told. I used the Exacto knife on my cutting board to cut the mouth, eyes, and nose designs for these glowing Halloween glass pumpkins. Two of them (the orange one and the black one) were made by cutting the shapes out of the tape and sticking the actual mouth, eyes, and nose to the pumpkin. The other, the white pumpkin with the black face, was made by cutting out the shapes and putting the negative on the glass pumpkin – creating a homemade stencil if you will.

After making the tape faces, I painted the glass globes with the spray paint to create the Jack ‘O Lantern faces. I let the paint dry, tied some twine securely onto the neck of the globe (remember that groove in the neck is designed to hold them onto your ceiling). Then they were ready to hang. WARNING: Be careful to put the face the correct direction when you’re getting ready to paint – you don’t want upside-down Jack O’ Lanterns hanging on your porch!
The Orange and Black Glowing Pumpkins
For both of these pumpkins, the process was the same – cut out the face shapes with tape, and stick the pieces onto the glass globe. The set the globe onto a sturdy, paintable surface, and spray paint the entire thing – including the tape shapes. When you remove the shapes you will have the color on the entire “pumpkin” while leaving the face bits white (or clear) so the light shines through without any problem.
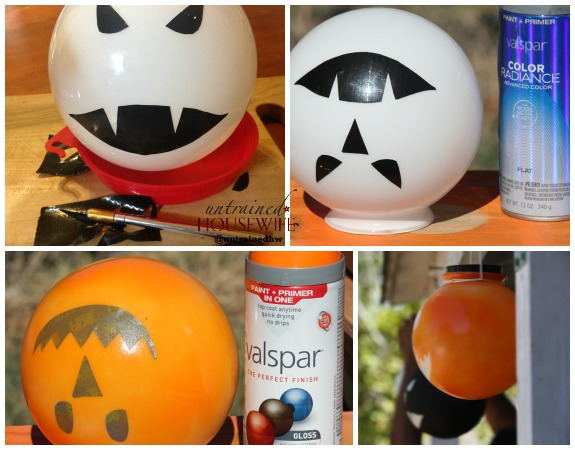
Note that with the orange I chose to leave the color a little uneven. My kids think it looks “cool” like a “real pumpkin”. I think they are just saying that so I’ll feed them, but it works for me. Seeing them at night now I would give each pumpkin a second, full coat of paint to make them glow more evenly but they look really cool.
The White Glowing Pumpkin Face
For this pumpkin the process was just a little different. I cut the shapes out of the duct-tape (I found it more flexible than the masking tape for adhering to the glass pumpkins) and then stuck the OUTSIDE part of the tape to the glass globe. Line up the face shape holes when you stick the tape down so your finished product will be symmetrical. In this case you’ll be putting the spray paint into the middle of the tape cut-outs…like using a stencil.

The white pumpkin is my favorite but my kids like the black one.
Note that you have to be SURE the tape is completely stuck to the glass or the shape will be running and ruined. I had one “bubble” in the duct-tape and had to scrape some paint off the edge of my mouth so that he wouldn’t look deformed. Notice also in the picture above that you can cut extra strips of duct tape to completely cover the entire front half of the glass globe so your face is clean and will stand out.
I think the white pumpkin is my favorite, but my husband likes the orange pumpkin and my kids like the black one. I love that these Halloween decorations will last more than one season and can be so easily personalized according to your personal tastes and desires.

And they look awesome at night.
Check out all the Halloween and Fall decor ideas from Lowe’s Creative Ideas magazine, which is a free subscription! Free subscription, folks! I’ve been so inspired to use more color lately through the fabulous Valspar selection at Lowe’s. Check out Lowe’s on Facebook and Pinterest also for more inspiration.
I actually like these pumpkins gathered together on the chair too and think they’d look amazing sitting on a haybale or tumbled together in a little garden wheelbarrow. What color combo do you like the best?
I was provided a gift card to purchase supplies at Lowe’s for this Creative Ideas challenge; however, the idea, execution, and supportive kids are 100% my own.


Those are super cute, Angela! It might be just as easy to freehand brush paint the faces on the white one. I would also consider clear-coating all of them to protect them a little more. 🙂 Great job!!
I had looked for a clear glass globe because I wanted to try the Frosting spray paint you can use on bathroom windows and stuff to make a cool frosted pumpkin face. I’m going to try to pick up some “fish bowls” and try it that way too.
I’m sure you could let kids free-paint them or download stencils off some free printables websites. I just happened to have a ton of tape from some painting projects.
That looks like a fun project. We hang ghosts up from the tree branches every year. We might try to add a few ghosts this year if there’s time.
Cute idea! I like that there are no candles to replenish and light each night of the season. How fun. I love ideas for fall as they can be displayed for weeks.
These are awesome. As I got down to the end, I see a few other pages that might be interesting to visit. Thanks for sharing!
I don’t do Halloween but those are adorable! And simple enough that even my non-crafty self could probably do them!
first time I have been over. fun project. Happy Halloween. ~jb
So great to have you visit Untrained Housewife! We’re all about intentional and self-sufficient living and welcome contributors who want to share on a variety of topics. If you ever want to guest post or contribute just give me a shout and I’ll set you up. 🙂
You did awesome! I’m so proud of you!!!!
<3
These are so cute!
These are adorable! What a fun project to do with the kids.
absolutely brilliant craft idea. I love pumpkins and jack o’ lanterns. Even without kids to impress, this is a great craft Thanks for the idea – Janet
Thanks!
These are awesome! What a GREAT idea! Too bad we live in an association and wouldn’t be able to hang these up outside. But it’s great they would work inside as well.
Yeah absolutely! I took a photo of them (first one) on the patio chair so I could get a better angle on the faces and thought “gosh those look so good sitting there!”. I think you could make an awesome mantle display or stair or windowsill decor….pretty.
Gorgeous crafts, Angela! Thanks for featuring classic collection and some spooky ideas. Our whole family enjoyed these Halloween decorating ideas; we would definitely give it a try hope they turned out like yours.
I recommend going to two, full coats of the orange and black coloring, letting the paint dry thoroughly in between coats. If I were doing another set…. 😉
Oh, how very cute these are! You are so creative. I never would have thought of it.
These are so cute!! I love the use of the led lights…going to keep that in mind! I pinned it! Thanks for linking to my Halloween Link Party!
Susan
So much easier than trying to light candles in there. Lol!