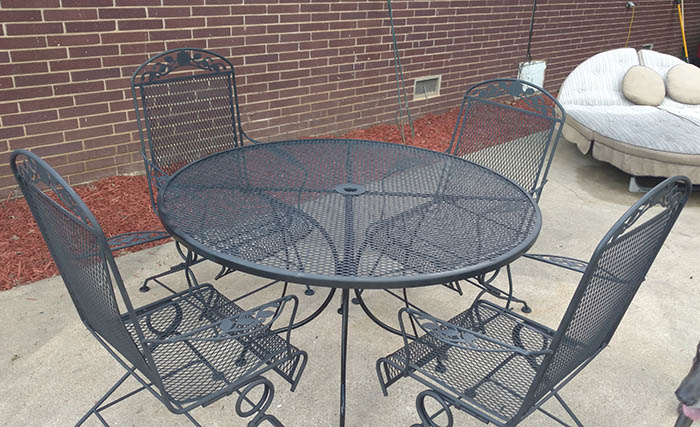
We have lived in this house for going on seven years now. And every year I sit on my back porch and dream of some incredible backyard makeover – you know, like the ones on HGTV. But we are frugal – we have to be, we have teenagers. So spending an arm and leg and other limbs on a dream backyard makeover just is not an option. There are so many other things I would rather spend money on. But, I still wanted that oasis.
I was determined this year to make a space for US. A place to go and relax and enjoy our family time. But I also had to consider our budget – which wasn’t much to start with. So – how do I get what I want without breaking the bank? A little sweat, a lot of determination, and of course, elbow grease!
My dad gave us a porch set about ten years ago – just a table and chairs made out of metal. It isn’t the fancy wrought iron, just plain old metal. And after that many years of sitting out on the porch, it was rusted and had seen its better days. I started looking at new/used porch furniture – holy wow! That stuff is expensive. I was determined to have a nice set, but there is no way I was spending that kind of money.
So began our project – our frugal porch furniture makeover. It really is amazing what a little Rustoleum, time, and elbow grease will get you.

What you will need:
- Some old patio furniture – ours was metal, which made this project very simple.
- Sand paper – or a nifty electric sander. I did ours by hand and it wasn’t too bad.
- Rustoleum spray paint in whatever color you desire. We also had a can of primer and that went under the black that we used. We did not use it on all spots, only the ones with really bad rust.
- Rustoleum clear coat. If you use a glossy paint, you may not even need this step. If I had to do it over again, I would just use a gloss to start with, eliminating the need for a clear coat.
- Tarp, painter’s cloth, or something to put your furniture on while you paint it to keep it from getting everywhere. Unless you do it in the yard, which can then be mowed away.
We got away with 3 cans of Rustoleum color and 2 cans of clear coat. Super frugal, right?

Step One. Once you have everything gathered up, start by sanding down the furniture. Sanding roughs up the material so that the paint will stick better. You might be tempted to skip this step – don’t. We had a lot of peeling and chipping on ours, so had we skipped this step, the new paint would have peeled right off.

Step Two. If you are going to use the primer – that needs to be applied to the furniture or spots where you want to use it first. Be sure to let it dry before starting on the first coat of the colored paint. I let mine dry for about 15 minutes and it was good to go.

Step Three. Apply the paint generously, but be sure to do a quick back and forth motion with the paint. If you are not familiar with spray paint, or have not used it often, if you just “point and shoot” you will wind up with a runny mess.

Step Five. Once it had dried for 24 hours, we shot the set with a coat of the Rustoleum clear coat. We let it dry for 24 hours before using it.

Voila! A beautifully restored patio set for very little cash, a little bit of sweat, and a lot of elbow grease! We managed to pull this project off with a total of only $36.49! If you don’t already have a rusty old patio set – shop your local thrift stores, flea markets, garage sales, craigslist, etc… You would be surprised at what people are selling super cheap or giving away – until they see this post, of course!

At some point we will probably add a colorful umbrella to our set – but for now, we are so happy with the way that it turned out!
What do you think? Have you done a frugal furniture or other project to make yourself an oasis on a budget? I would love to hear your ideas!


Looks great! Will have to try this. Thanks for sharing.